Let's Build a 3D Mask Simulator

I've been looking for a project to learn some new skills to make use of when developing for the web and I stumbled across an example of motion detection using Javascript and HTML5's getUserMedia API. This immediately gave me an idea of using it to build something fun: a 3D mask simulation that would use the webcam to capture a video feed from the user's webcam and then place a 3D model of a mask on the user's face.
Let's recap on what we'll be covering in this series:
:: Using HTML5's getUserMedia API
:: Motion tracking and finding features in a webcam video feed
:: Using the video feed in a WebGL scene
:: Moving a 3D object in the WebGL scene according to the motion tracking
It's quite obvious that we have a lot to pick up.
Let's get started!
Part 1: Using HTML5's getUserMedia API
A while back, WebRTC API released the MediaDevices interface which provides the getUserMedia() method. Using this method in a compliant device/browser will prompt the user for permission to use video and/or audio devices. When given permission, the method will return a Promise with a MediaStream object. You can read more about it in the links above, I won't go into much detail here.
This enabled the use of a webcam stream in the device/browser and its manipulation with Javascript. That opened up countless possibilities to use that information for richer interaction with the users.
NOTE: If you want to follow up this series while coding yourself, you'll need a development environment setup. At the end of the series, a repository will be made available with the final project source. I'm serving HTML via a LAMP stack in a virtual machine using Vagrant, and using Chrome 52.0.2743.82 (64-bit) in OS X El Capitan 10.11.6. Also note that unless your server has HTTPS enabled (for local development, a self signed certificate should suffice), Chrome will throw warnings about using the getUserMedia API in unsafe conditions. Again, these topics are out of scope for this article, so I won't cover them, but let me know if you have any questions regarding this.
As a first step towards our greater goal, we'll get the stream and place it in HTML document. Let's do this now!
Create an empty HTML5 document with the HTML5 doctype declaration. Also, link a javascript file in that document. You can also add a CSS file if you want to. We'll need a few HTML5 elements in the body section of the document in order to have a video stream as we want to see it and another as it's being handled/captured for debugging purposes. This is how I did it:
index.html
<!DOCTYPE html> <html> <head> <title>Augmented reality mask simulator</title> <!-- STYLE --> <link rel="stylesheet" href="style/style.css" /> </head> <body> <!-- CONTENT --> <canvas id="inputCanvas" width="320" height="240"></canvas> <video id="inputVideo" autoplay loop style="display: none"></video> <canvas id="debugCanvas" width="320" height="240"></canvas> <div class="results"> face center x: <span class="cx"></span><br> face center y: <span class="cy"></span><br> face angle: <span class="ang"></span><br> FOV: <span class="fov"></span><br> </div> <!-- SCRIPTS --> <script src="https://code.jquery.com/jquery-2.2.4.min.js"></script> <script src="js/inc/headtrackr.min.js"></script> <script src="js/main.js"></script> </body> </html>
Note that I added a few things:
:: jQuery - i'll probably need it for later, so I threw it in right now.
:: headtrackr.js - I won't be developing the motion tracking script from scratch. Rather, I'll be using this publicly available library to tackle this issue. You can read about it here, as we'll be using it quite extensively.
:: main.js - this will be our main source file where we'll do all the magic.
Let me walk you through it: I created a canvas element that I will use to display my webcam's stream, which represents its input. The video element would naturally provide it, but I'll use a canvas element instead so that the library can interact with it. I also created another canvas element to serve as a debugging view for the motion tracking library I'm using. Here we'll be able to see the result of the tracking script's operation. There are a few options we can explore to try to make it perform a little better, but at the moment the vanilla settings should be enough.
Also, there is a .results div placed in the top right corner so we can see the changes in some parameters we'll be using to compute our behavior.
main.js
var videoInput = document.getElementById("inputVideo"); var canvasInput = document.getElementById("inputCanvas"); var canvasDebug = document.getElementById("debugCanvas"); var htracker = new headtrackr.Tracker({ ui: true, debug: canvasDebug, calcAngles: true }); htracker.init(videoInput, canvasInput); htracker.start(); document.addEventListener('facetrackingEvent', function(event){ var fov = htracker.getFOV; $(".cx").text(event.x); $(".cy").text(event.y); $(".ang").text(Math.floor(event.angle*180/Math.PI)); $(".fov").text(fov); }); navigator.getUserMedia = navigator.getUserMedia || navigator.webkitGetUserMedia || navigator.mozGetUserMedia; window.URL = window.URL || window.webkitURL; var camvideo = document.getElementById('monitor'); if (!navigator.getUserMedia) { document.getElementById('errorMessage').innerHTML = 'Sorry. <code>navigator.getUserMedia()</code> is not available.'; } else { navigator.getUserMedia({video: true}, gotStream, noStream); } function gotStream(stream) { if (window.URL) { camvideo.src = window.URL.createObjectURL(stream); } else // Opera { camvideo.src = stream; } camvideo.onerror = function(e) { stream.stop(); }; stream.onended = noStream; } function noStream(e) { var msg = 'No camera available.'; if (e.code == 1) { msg = 'User denied access to use camera.'; } document.getElementById('errorMessage').textContent = msg; }
In our javascript, we simply fetch the elements we want to interact and populate with the streams, create a new Tracker instance and pass it a few parameters, start tracking the webcam and then create functions in case the getUserMedia API isn't available in the device/browser or access to the camera is denied.
If everything went according to plan, when you access your page, you should see something like this:
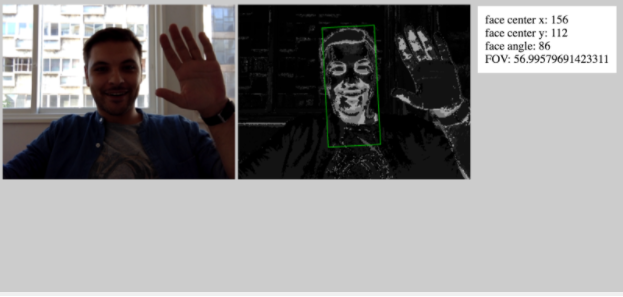
Right now, we already accomplished something rather important. We learned how we could get the user's webcam stream and using the headtrackr.js library, track motion in it.
Our next step will be to figure out how to enhance the motion detection so that we can find, or at least extrapolate, the position of facial features as well. This will allow us to then use these parameters to calculate some measure of depth from the stream, which will be needed to rotate the 3D objects later down the road.
Keep tuned for more updates!